Monthly Archives

April 2017

Paper Pickin’

By | Tweek Imaging | No Comments

Choosing which paper is right for your project can be tough! We wrote this post to make it a wee bit easier for you. Read on for our favorite papers, tips and more.

So, you’ve found the images you’d like to print. Now you’re stuck on the window that is asking you to choose from our huge paper selection. Good luck! I hope that works out for you. Order one in every paper. It’ll be fine.

Just kidding! Guess what!? We’re going to share some thoughts and helpful images with you today. We’re even going to tell you what our staff picks are. Of course we’d love for you to order one of everything but what we really want is for you to come back and order more! A true documentation of your work/life. Don’t break the bank on your first order.

When you are placing your order1 you’ll notice we have over 20 paper options. And that isn’t even counting our canvas options2. Ordering prints online when you aren’t familiar with paper types or brands is difficult. Hopefully, this post and our images will help you. And if after all of this you still have questions…give us a call or shoot us an email and we can get3 you a paper sample booklet4!

Ok, you’re on our site looking over our paper options…they are divided into three tiers. This is based on the pricing of the paper. One way to look at making a choice is to decide your budget and then go with a paper within that tier. Now you’ve chosen your tier and you can look at a shorter list of paper types and descriptions. One thing you can count on with all choices is acid-free, archival5All of them are such.

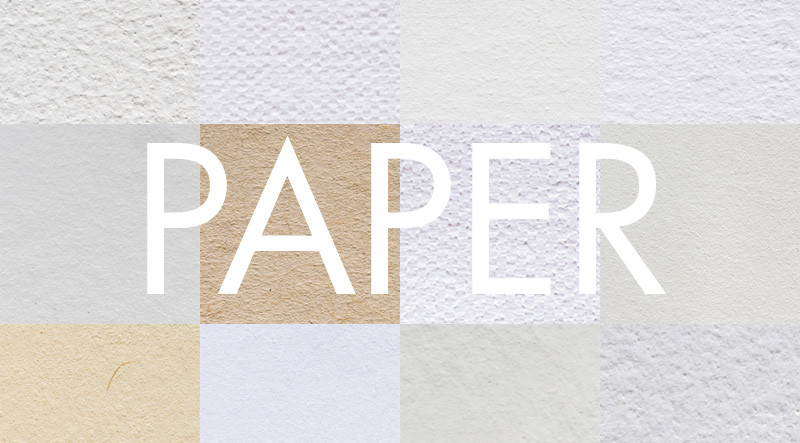
Here is where our helpful photos come in:

These images are here so you can see the true coloring and textures of the papers. You may be thinking, what in the world is that brown French Paper doing in there?! Well, let us just say, Tony printed a black and white image on that paper the other week with a floating border in a black frame…winner for sure! We strive to always think creatively and outside of that stuffy box. Does it always work? No, but sometimes it REALLY works and those times are worth it!

Sometimes the choice is easy. You’re a portrait and wedding photographer and your clients want a handful of 4x6s, a couple of 5x7s and an 11×14…Premium Lustre Photo is your classic choice. Or, you need some of your own family photos printed…again, this is your choice. Maybe you’re a printmaker like Diane Fox   and you choose a paper that transforms your photograph into art like German Etching. Maybe you’re Britton Sharp who loves their art to have added character and dimension just like the original sketches looked and you choose LexJet Velvet. Or, maybe your photograph speaks completely for itself and you choose a very smooth paper that doesn’t distract from your image like Sunset Photo Matte chosen by Clifton Barker for his Sphynx on Film.

Here are our staff picks for a little more insight:

Tony: Hahnemuhle Bamboo Fine Art

“I love the texture, so different than any other paper, especially the ones we are currently offering. The eco friendly makeup of this paper makes it an easy choice when printing black and white photography or even fine art prints of artwork. It would be so cool to brag about this at an exhibit, you would be the shining star in a room full of everyday paper users. Most of my work is contrasty black and white film photography and it presents my vision very nicely.”

Emily:  Sunset photo matte

“I tend to be a paper snob, coming from a printmaking background, and most of my personal work is black and white film photography. This paper reminds me of ilfords matt6 fiber paper that’s used in the darkroom. A bit soft, but I find that it lends a certain atmospheric feel to a photo.”  

Kevin:

Paul Revere Textured Watercolor

“The texture of this paper is perfect for a reproduction of an original watercolor”

Alison:  Premium Lustre Photo 

“This is perfect for my photography clients. It isn’t glossy and it isn’t a boring matte. It’s just right.”

Colleen:  French Construction

“I really love the texture of the paper, and the colors that are available. High contrast black and white prints look so cool on this paper. I also really love the company. French is family owned, and also very environmentally conscious. I feel really good about using their paper.”

Lynne:  German etching

“I like the German etching paper and the texture it adds to photos. It can be the perfect paper to print on if you have a great photo that is slightly out of focus as the texture disguises the error.”

Whatever you are printing we have no doubt that we’ve got the perfect paper option for you. Don’t forget that we are one phone call or email away. We would love to help you make the decision.  

  1. As you have done, will do and will continue to do soooo often…
  2. Have no fear…we will talk about that soon too.
  3. Had to correct the spelling of git to the actual word, get…the southern accent comes out in our writing in ways we’d never imagine and never want to admit. You’re welcome for that insight.
  4. Sample booklets include a sample of every paper type as seen in our post. They are FREE with any printing purchase and are shipped straight to you along with your order.
  5. What does acid free archival mean?  According to Wikipedia: Often, cotton rag paper is used for archival purposes, as it is not made from wood-based pulp. Thus, “archival paper” is sometimes broken down into two categories: Conservation-grade — acid-free, buffered paper made from wood-based pulp. Archival-grade (also Museum-grade) — cotton rag paper made from cotton pulp.
  1. Ilford calls it MATT others call it MATTE…who do we listen to?

Meet Matt Day

By | Artist, Photographer, Tweek Imaging, Uncategorized | No Comments

Hey you guuuyyys!!1

New regular occurrence happening here today. Starting now every month or so you can expect to get a look into one of Tweek’s artists’ lives on the blog! Pretty cool huh? This month we are starting that new trend with Matt Day.2

One thing we love about Matt is that he often allows Tweek to make prints for him. But even more what we love is the dedication Matt has to his craft and the community at large. After reading and doing a little more digging on this guy you’ll learn he never puts his camera down. And he has done so for so long that his camera has just become a part of him. Oh gosh, we’ve already said too much! We will stop talking so you can move on to the good stuff below. Read on my friends! Huge thanks to Matt for spending some time with all of us!!

TI: Where did this all start for you? What made you pick up a camera?

MD: It’s a bit of a long story, so I’ll try to keep it brief! In April of 2004, my brother was 17 years old and working on a local farm. He had been working there for years, but one day, he was attacked by one of the bulls on the farm, paralyzing him. While he was in the hospital recovering for some time that spring and summer, I was living with friends and family, back and forth. My mom was staying at the hospital with him, my dad was making trips to the hospital and working on getting our house adjusted to accommodate a wheelchair. They had to add on a room to our house. So their hands were full and I was still finishing up the school year, so I was staying different places. My aunt and uncle flew in from Florida to visit my brother and when they got here, they had a camera for me. They knew I was always playing around with video cameras and enjoyed that kind of stuff. They told me to take the camera and document his recovery and also document what I was doing so that when I see my parents and brother, I could show them photos of what I had been up to. Hanging out with friends, being a 13 year old kid. That sort of thing. So that’s what I started doing and 13 years later, I’m still doing the same thing.

TI: Are you shooting only film or a mix? Is there an obvious choice when you choose one over the other?

MD: I’m shooting a mix. For years, my only camera was a 35mm Minolta XG-M. Then I got a DSLR in 2008 and started shooting a mix of the two. Back in 2012, I became completely obsessed with film all over again. I was shooting every film, every format, every camera, etc. Since then, I’ve always had a mix of different cameras, film and digital, but this year I’ve slimmed things down just as a personal exercise. I wanted to simplify and focus on the work rather than the tools. I have a Leica M6 and Leica M262. They’re as similar as you can get, but one is film and one is digital. Those are my two cameras that I use for my daily documenting. When I’m shooting portraits, working with artificial light, I use a Nikon D750. I prefer using an SLR for portrait work and I also use this camera to record my YouTube videos. I enjoy shooting with my Leica cameras more, but there’s a tool for every job.

TI: Color or black and white? First thought! Don’t think about it! Now, why?

MD: Black and white, no doubt about it. Being a film shooter, I love the darkroom. I love developing my film, scanning my film, printing my film in the darkroom. It’s just a special process. But even when shooting digital, I try to shoot with the mindset that it will become a black and white edit 99% of the time. It’s just what I’ve grown to know and love. Color can be too distracting. Composition and light can quickly be overlooked because “Wow, look at the color of that sky!”

TI: We love your YouTube Channel. Lot’s of helpful tips there. Did you sense a need in the community that led to creating these videos? Just too much knowledge in that head of yours to keep it all in? Brief plug for your artist spotlights on your Podcasts as well. Equally enjoy that outlet.

MD: Thank you! I have a lot of fun with the YouTube channel and the podcast as well. And that’s exactly why I started it. I couldn’t find the videos I wanted to see so I made them myself. It started with just sharing info on film cameras because at the time, there wasn’t anything like that on YouTube. There are a ton of YouTube channels about film photography nowadays and I think it’s great. The more exposure film photography gets (pun fully intended) the more people that will be buying film. That’s a great thing. But now that there are so many film channels on YouTube, I’ve tried to structure mine differently. The videos I couldn’t find back in 2014 are now everywhere, so now I’m trying to make other videos that I can’t find. I just want my channel to be my own and share things from my perspective. That’s why I love other certain channels, they all have their own style and presentation.

TI: It looks like your favorite youtube subject is film photography with a smattering of other things – does subject matter get influence from what you are doing day to day or are you getting questions and requests?

MD: I try to take in requests as much as I can. Sometimes I get requests for things that just aren’t feasible or too time consuming, as I have a lot on my plate with family, work, etc. But I try to always be listening to the feedback so I can improve the channel. At the end of the day, I still want it to be a reflection of me. So if I’m shooting something entirely different than usual, I want to share it. I try to be as transparent as possible and just share my experiences as a photographer. To me, that’s relatable for people and gives them something they can hold on to.

TI: Speaking of film…where are you sending your film? Are you developing and scanning it yourself? Favorite scanners?

MD: I develop and scan everything myself. For about a year, I was sending everything to theFINDlab because I was working there at the time. Quick shoutout to them because they are absolutely incredible at what they do. Seeing an entire crew, top to bottom, working so well together was such an eye-opening experience for me. They care about their customers and they care about film. Because of those two things, they’re working tirelessly around the clock to help them both. It’s amazing. But now that I’m scanning at home again, I’m working with an old Epson V600, nothing fancy. I used to use a Pakon f135+ for my 35mm film and that thing is amazing for the speed, but prices skyrocketed and I took advantage of it and sold mine. Something about us film shooters, we’re always buying, selling, and swapping.

TI: So, you carry your Leica with you everywhere. You document most everything. What in the world are you doing with all of those images? You’re a closet scrapbooker aren’t you? Cardstock, special scissors that cut fancy edges, paste…that’s what you’re doing. How do you archive?

MD: My mom would love it if I was a scrapbooker because that’s her world. Haha. She’s got a room at her house that is specifically for scrapbooking and sewing. It’s wild. But for me, I’m just collecting the photos. Every day life, that’s what I’ve always gravitated towards and I think it’s because of how I started shooting. It’s what I learned to do. So I archive my images by year. Every year, I start a new film binder and I just add to them as I develop and sleeve the negatives. It’s a little daunting when I need to find a certain image, but I have a pretty good memory so I can usually remember by season or month and it doesn’t take me too long. For digital images, I archive by folders from each import. So at the end of the day, if I’ve shot any digital images that day, I add a folder of that day and import. THEN I BACK THEM UP ONTO ANOTHER HARD DRIVE. That’s an important step. Sorry for shouting.

TI: Do you feel like always having a camera is an extension of you? Do you feel like it creates a barrier from experiences in your life? Have you ever felt differently than you do now?

MD: Absolutely. It’s what I’ve always done and it’s just how I operate on a daily basis. I don’t think it creates a barrier because it’s something I’ve always been mindful of. There’s a time to take the photo and there’s a time to just let it be. To me, it’s entirely instinctual so I don’t have to think about it each time I grab the camera, I just trust my gut and go with it.

TI: Of course, Tweek wants to know, how do you feel about making prints of your work? How often are you doing that for yourself or your clients?

MD: Making a print is crucial. Whether it’s personal work or client work, holding the photograph in your hand is a big part of the process. There’s something special about it that you don’t get from viewing it online. For myself, I try to print as frequently as I can, as you guys know! I print big and small, it all depends on the photo. Even if I don’t plan on framing it and displaying it, there are some photos that I just want to see big in person and hold a huge print. I have boxes and boxes of prints to look back on.

TI: Do you sleep these days? How do you manage a family, family business, photography clients…? Do you have any secrets?

MD: My wife always jokes with me that I’m always tired and she’s not wrong. Haha. I have a full plate, but I like to keep it that way. Free time makes me anxious. I want to stay busy. I like to work, I like to learn, and I know how precious time is. Also, coffee.

TI: Why work with Tweek?

MD: I’ve worked with big box labs before, and while I was okay with the quality, there was never anything more than that. It was like going to Wal-Mart. I was just another customer and they were just another store selling the same stuff as the other big stores. Ever since working with Tweek, it feels like I’m going to my favorite local coffee shop and seeing friends there. The communication, the customer service, it’s an actual relationship. I get excited to place an order, to receive a call or email, it’s working with friends. To me, that goes a long way. On top of that, the options for prints and the attention to detail is top notch. I never had prints like this before I started working with Tweek.

Current inspiration: I’ve been studying more and more of Danny Clinch lately. Particularly his studio work.

Current musical obsession: The Dead South

Favorite meal of the day: Late night bowl of cereal.

Coffee or chocolate: Coffee!

  1. Goonies? Anybody?
  2. So many links could be used to connect you to his work. Like his YouTube channel, his Podcast, his Instagram, other interviews by big media outlets like this one

Float that Image!

By | Artist, Photographer, Tweek Imaging | No Comments

Not sure how to float your images on white? This post is dedicated to teaching you our floatin’ ways. Read on!

Hey ya’ll! Way to keep up your blog reading. You’re doing such a fine job!

So a couple of weeks ago we mentioned how much we loved Emily’s folio prints floating in a sea of white space…now you’ve got the itch to do something similar. We know. We do too. In honor of these creative desires we bring you another helpful tips post! This entry is what we would like to call: Print that Floater!

Floating Image: your image is smaller than your paper size therefore making it appear as though your image is floating in a sea of white space. It appears that way because, well, because it is literally printed in a sea of white space. As seen above in Kyle Myles’ photo.

Why would you do this you ask? Because, with the right image, it is so visually perfect. Because you’re needing to accommodate large and small images on the same page size in your portfolio. Because you’d rather spend a little bit more on your print and a lot less (a.k.a. About $30.00 depending on the mat size) on a custom mat for your frame. Because you just want to try something different. Because, as Emily says, “you want your image to breathe.” That’s why.

A couple of clients are interested in this idea and we have figured out an easy solution to make ordering easy. We have two options based on the program you use most or prefer. Here is what you’ll do in either Lightroom or Photoshop:

Lightroom:

  1. We’ve made easy to use templates1 that you can download here.
  2. Once you’ve downloaded the templates you’ll drag them into Lightroom.
  3. Import your images you’d like to float.
  4. Open the Print module of Lightroom.
  5. Select the template size and then select and drag your photo into the photo box.
  6. Choose ‘Print to File’ in the lower right corner to export your image as a jpeg or tiff.
  7. Upload at www.tweekimaging.com to print.

Photoshop (Watch this video or follow the instrutions below):

  1. Open your image in photoshop.
  2. Size your image to the size (Image > Image Size) you’d like it to be. Make sure your resolution is an acceptable size.2
  3. Update your canvas size (Image > Canvas Size) to the final print size.3
  4. Save as a jpeg or tiff file.
  5. Upload at www.tweekimaging.com to print.

Got it? If you have trouble or need more information please email or call us for some help! There are no dumb questions. Only dumb answers. Am I right?! Don’t let these extra steps scare you from trying something new! It will be super easy the next time you work on them and after you print an image this way you’ll be hooked.

We can’t wait to see what you send our way! Maybe we’ll even share it with our friends on the world wide web.4

  1. Feel free to make your own template…these are just some to get you started that we have had requests for in the past.
  2. This includes the resolution and dimensions you’d like the image to be inside of the white space. Resolution: 300 dpi is awesome, 200 dpi is great, 150 dpi is acceptable. Size (in inches): When sizing your photo make sure to do it in small increments to get better results. Here’s a great article if you’re a little confused. You can make your photo standard sizes or you can go with something based on your image itself. This is all up to you.
  3. Your canvas is the size of the whole piece. So say you are hoping to fill an 11×14 frame size…your canvas will be 11×14 and your image whatever size you’d like. Changing your canvas size does not effect your image resolution.
  4. Thank you again Al Gore for inventing this web we can share things on. What would we have done without you/it?!